Integration into a Shopify webshop is very simple and only takes a few minutes. This benefits you with data protection-compliant, cookie-free and consent-free web analysis and thus avoids data loss due to consent requirements.
However, Shopify is not as open and flexible as other store systems when it comes to connecting third-party services. Shopify’s integrated consent management is also very limited and cannot differentiate between different purposes. The activation of etracker cookies after consent is therefore not possible.
These two integration options are provided and depend on the use of other services requiring consent:
- No third-party tags requiring consent, e.g. tags from Google, Meta or TikTok, are used: Implementation via customer events.
- Third-party tags requiring consent are used: Implementation via theme and order confirmation page.
1. Shopify integration via customer events
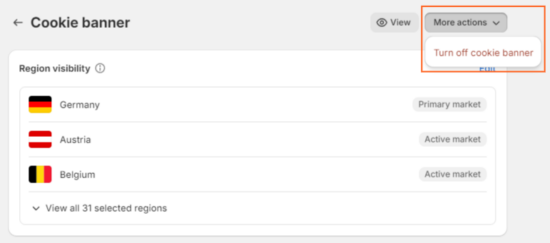
This integration option can only be used if the consent management provided by Shopify is deactivated. The following option must be set for this:
The native functions of Shopify are used to capture ecommerce events: product viewed, added to cart and purchase with item name, category and price.
Furthermore, these are recorded automatically:
- All page views with domain, URL and page title as well as assignment to areas based on the URL structure
- Internal searches
- Origin: referrer domain and path, organic search term (if transferred), classification of traffic by medium (direct, search, social media, referrer)
- Geo-information
- Technical information: device type, device name and manufacturer, operating system and version, browser, version and language
Instructions
To integrate, please proceed as follows:
1. Log in to your Shopify account.
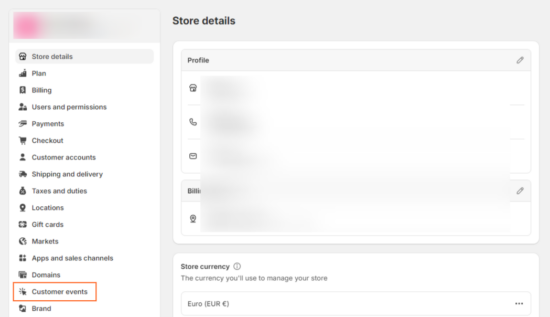
2. Open the settings of your store and select Customer events in the menu:
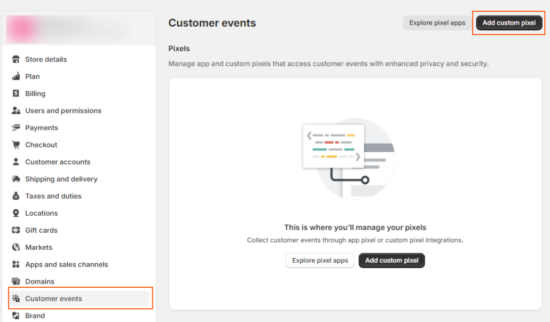
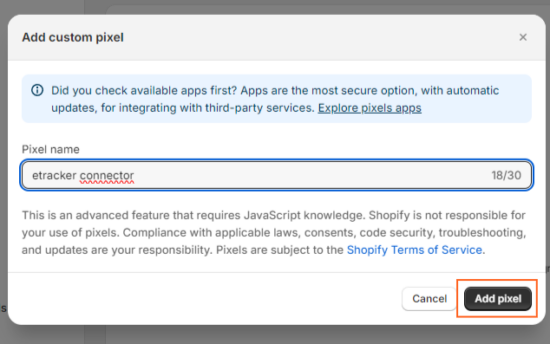
3. Click on Add custom pixel, enter a name of your choice, e.g. “etracker connector” and confirm by clicking on Add pixel.
4. Download the code and paste it here:
https://code.etracker.com/shopify_pixel.js
5. Replace <INSERT_ACCOUNT_KEY_HERE> with your individual etracker account key. You can find this in your etracker account under Settings → Account → Account key.
6. Click on Save in the top right corner.

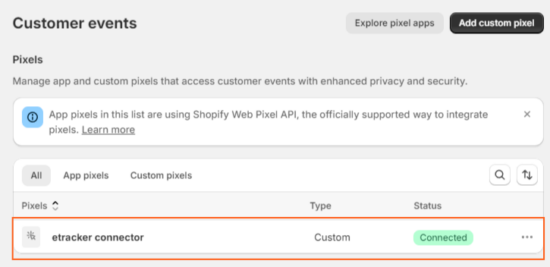
Done! In the overview of customer events, you will now find the custom pixel you just created with the status Connected.
2. Shopify integration via theme and order confirmation page
Please note that with this type of integration, the checkout pages cannot be captured before the order confirmation.
The recording of ecommerce events such as “product viewed” and “added to cart” is done by tapping Google eCommerce events. Furthermore, these events are recorded automatically:
- All page views with domain, URL and page title as well as assignment to areas based on the URL structure
- Internal searches
- Origin: referrer domain and path, organic search term (if provided), classification of traffic by medium (direct, search, social media, referrer)
- Geo-information
- Technical information: device type, device name and manufacturer, operating system and version, browser, version and language
- All external, mailto and telephone link views and downloads as click events
- Playable media (videos, podcasts, music) as events
- Scroll events per page (0-9%, 10-24%, …)
Follow these steps to integrate the etracker code into the theme.
1. In the Shopify admin area, go to Sales channels → Online store → Themes. Click on Edit code under the three dots and insert the etracker code into the head area of your theme.liquid.
2. Add the parameter data-ecommerce-grabber=”true” to the tracking code as in this example:
3. To be able to measure the orders, add the following etracker code to the order confirmation page. To do this, go to Checkout in the settings.
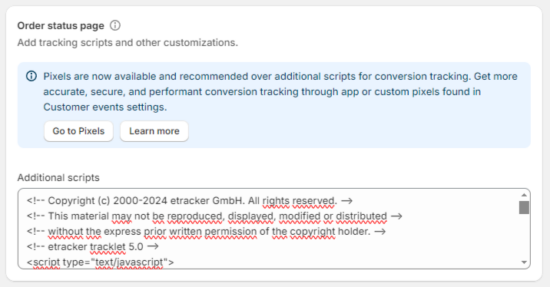
Insert the following code with your personal account key (instead of 1a2b3c):
<!-- Copyright (c) 2000-2023 etracker GmbH. All rights reserved. -->
<!-- This material may not be reproduced, displayed, modified or distributed -->
<!-- without the express prior written permission of the copyright holder. -->
<!-- etracker tracklet 5.0 -->
<script type="text/javascript">
   // var et_pagename = "";
   // var et_areas = "";
   // var et_tval = 0;
   // var et_tsale = 0;
   // var et_tonr = "";
   // var et_basket = "";
</script>
<script id="_etLoader" type="text/javascript" charset="UTF-8" data-block-cookies="true" data-secure-code="1a2b3c" src="//code.etracker.com/code/e.js" async></script>
<!-- etracker tracklet 5.0 end -->
<script>
var orderEvent = {
  orderNumber: '{{ checkout.order_id }}',
  status: 'sale',
  orderPrice: '{{ checkout.total_price | money_without_currency | replace: ",", "." }}',
  currency: '{{ checkout.currency }}',
  basket: {
    id: 'basket' + '{{ checkout.order_id }}',
    products: []
  }
};
{% for line_item in checkout.line_items %}
  {% capture category_list %}{% for category in line_item.product.tags limit:5 %}{{ category }}||{% endfor %}{% endcapture %}
  var mappedProduct = {
    id: '{{ line_item.product_id }}',
    name: '{{ line_item.title }}',
    price: '{{ line_item.final_price | money_without_currency | replace: ",", "." }}',
    currency: '{{ checkout.currency }}',
    category: {{ category_list | split: '||' | json }}
  };
  orderEvent.basket.products.push({
    product: mappedProduct,
    quantity: {{ line_item.quantity }}
  });
{% endfor %}
var _etrackerOnReady = typeof _etrackerOnReady === 'undefined' ? [] : _etrackerOnReady;
_etrackerOnReady.push(function() { etCommerce.sendEvent('order', orderEvent); });
</script>
You can find your account key in your etracker account under Settings → Account → Account key.
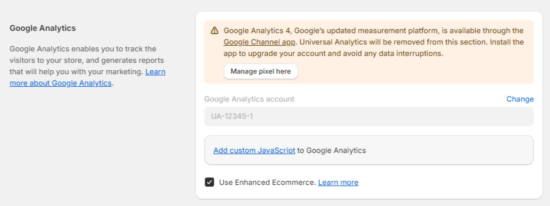
4. The last step is to add a fake Google Analytics 4 tag in Shopify to record which items are viewed and added to the cart. For this purpose, etracker can access the Google Analytics e-commerce events without Google Analytics actually being used.
You activate the GA4 tag as follows:
- In the Shopify admin area, go to Online store → Preferences.
- In the Google Analytics section, click Manage pixels here.
- Click on Connect my Google account.
- Select any value as the Google Analytics account for the GA4 property, e.g. UA-12345-1.
- Select a Google Analytics 4 property to connect.
The configuration entry should appear like this:
Done!